一、JRebel 介绍
JRebel 是 Intellij Idea 中的一个插件,它的作用是实时热更新我们的代码,让我们可以从大量且漫长的程序重启中抽身出来。java应用重启小则几十秒到一分钟,长则十几分钟,使用这款插件大大提到了我们的效率,让我们可以早点下班。本文主要介绍插件的激活以及远程热更新的使用。
二、JRebel 激活
激活程序Github地址:https://github.com/Byron4j/JrebelLicenseServerforJava
激活参考文章:https://blog.csdn.net/qq_34206086/article/details/130915257
第一步,idea 插件市场安装好 jrebel 插件。
第二部,gitbub下载激活程序,支持 maven 和 gradle,本地找到 /server/MainServer main方法运行。看控制台输出或者访问 localhost:8081 获取激活地址。
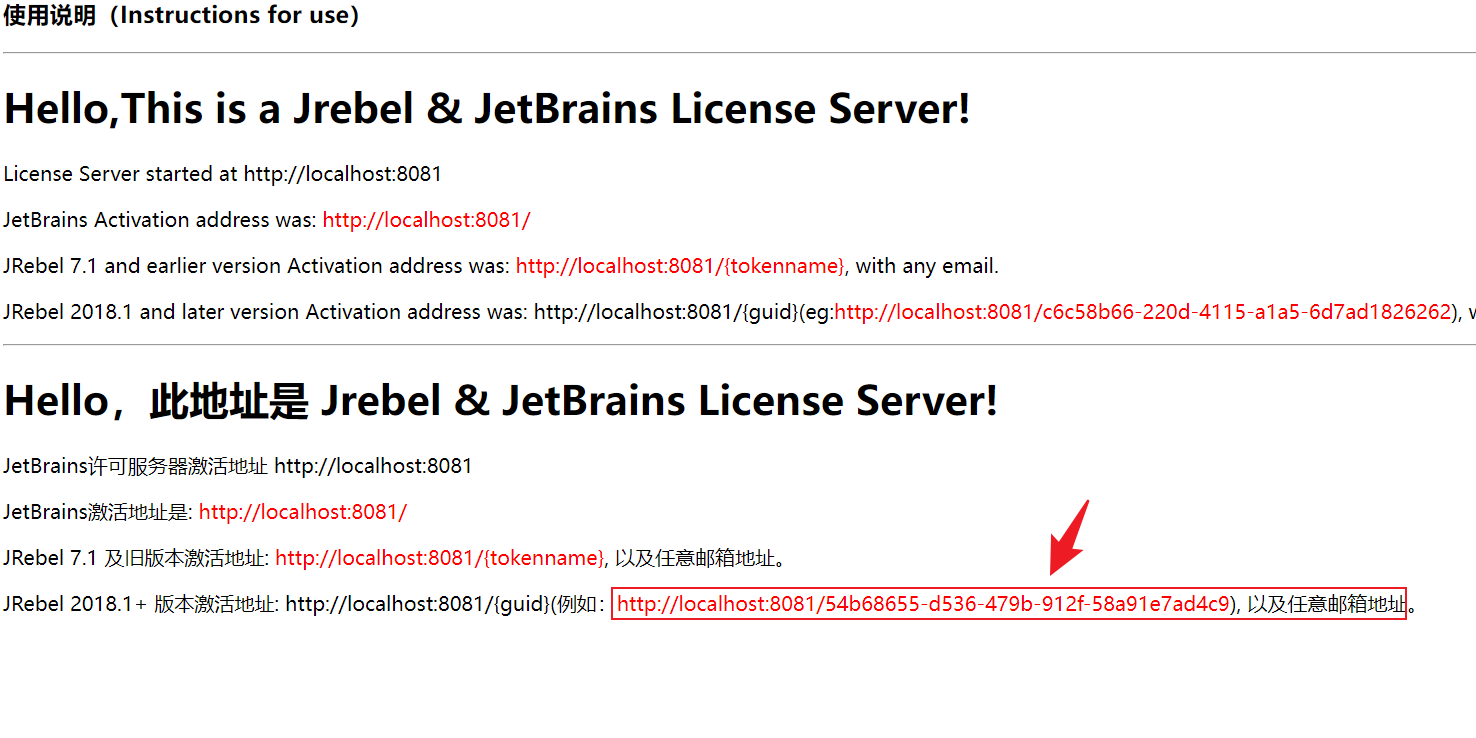 复制激活地址到 jrebel 激活地址上面,激活即可。如果激活失败,可以访问 https://www.guidgen.com/ 重新生成 GUID。
最后设置为离线状态,过一段时间后失效则重复上述步骤。
三、本地热更新
JRebel Run 启动。修改 java 代码或者 xml 之后,等待片刻(默认开启自动编译)或者使用 ctrl + f9 重新编译,JRebel 会热更新代码。建议使用手动编译(ctrl + f9),关闭自动编译,Settings | Build | Compiler,Build project automatically一项取消勾选。
只修改了单个文件,可使用 ctrl + shift + f9 编译当前文件。
四、远程热更新
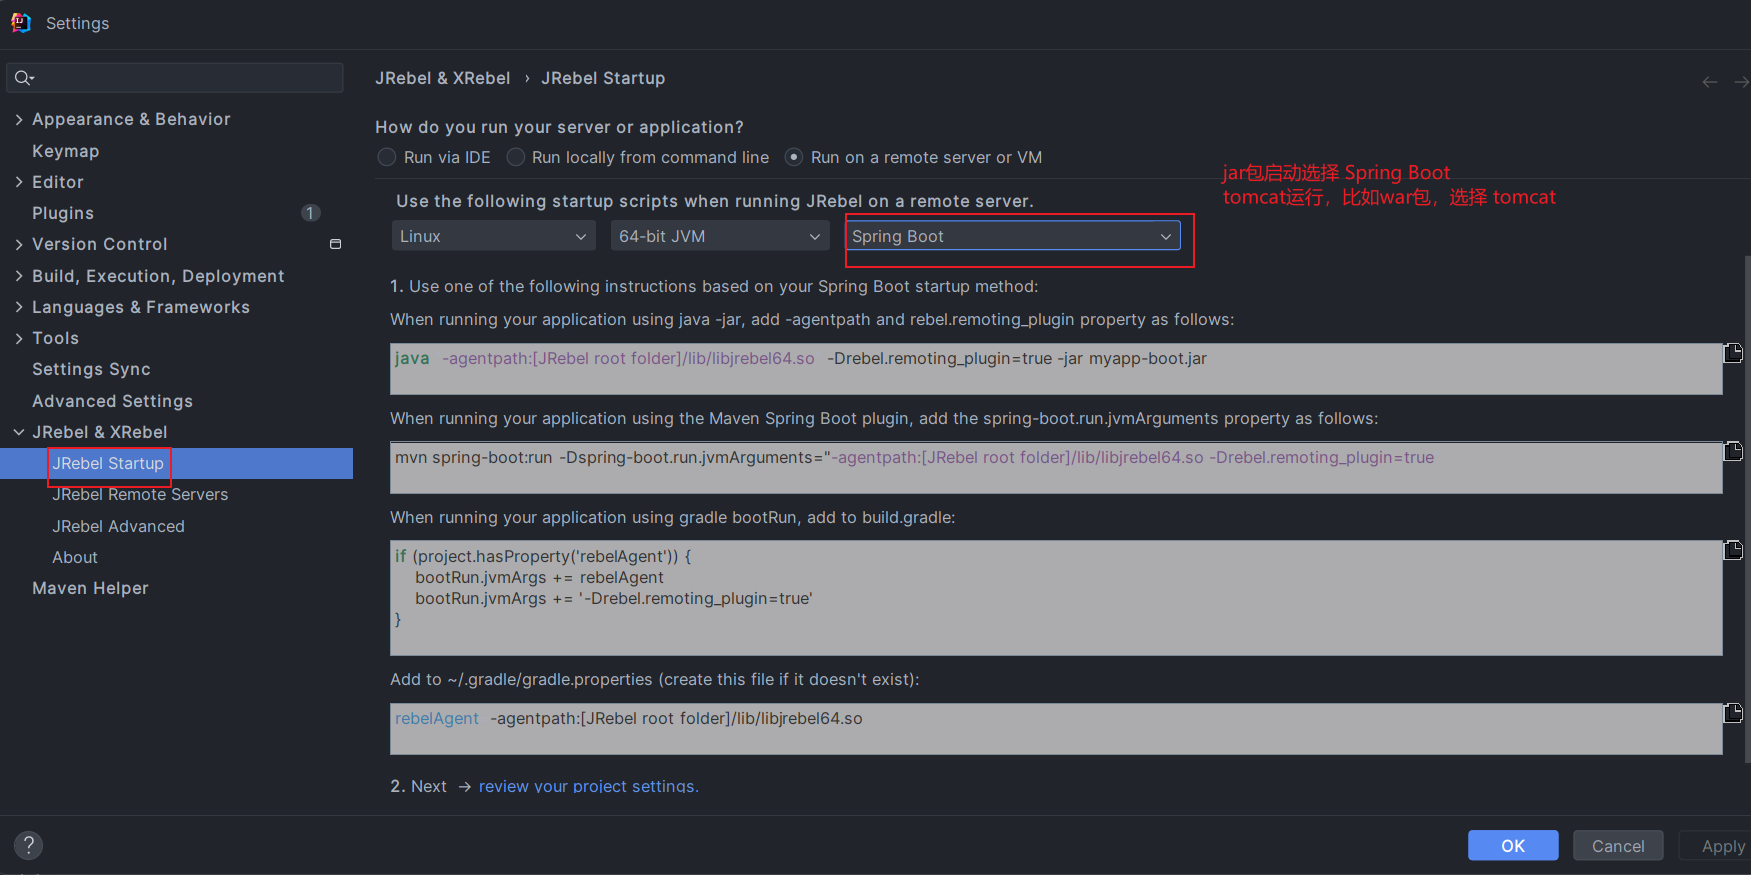
远程服务要热更新代码,需要使用 JRebel 的 Agent 启动应用。服务端要怎么处理,可以参考 Setting | JRebel .. | JRebel Startup。
注意:热更新并没有修改原来的 classes 文件,重启服务后,程序还是会变回原来 jar包或 war包的代码。也就是 JRebel Remote 热更新的变更重启后会丢失,这个可以简单重启测试出来。
参考:视频:https://www.bilibili.com/video/BV11B4y1W7mw
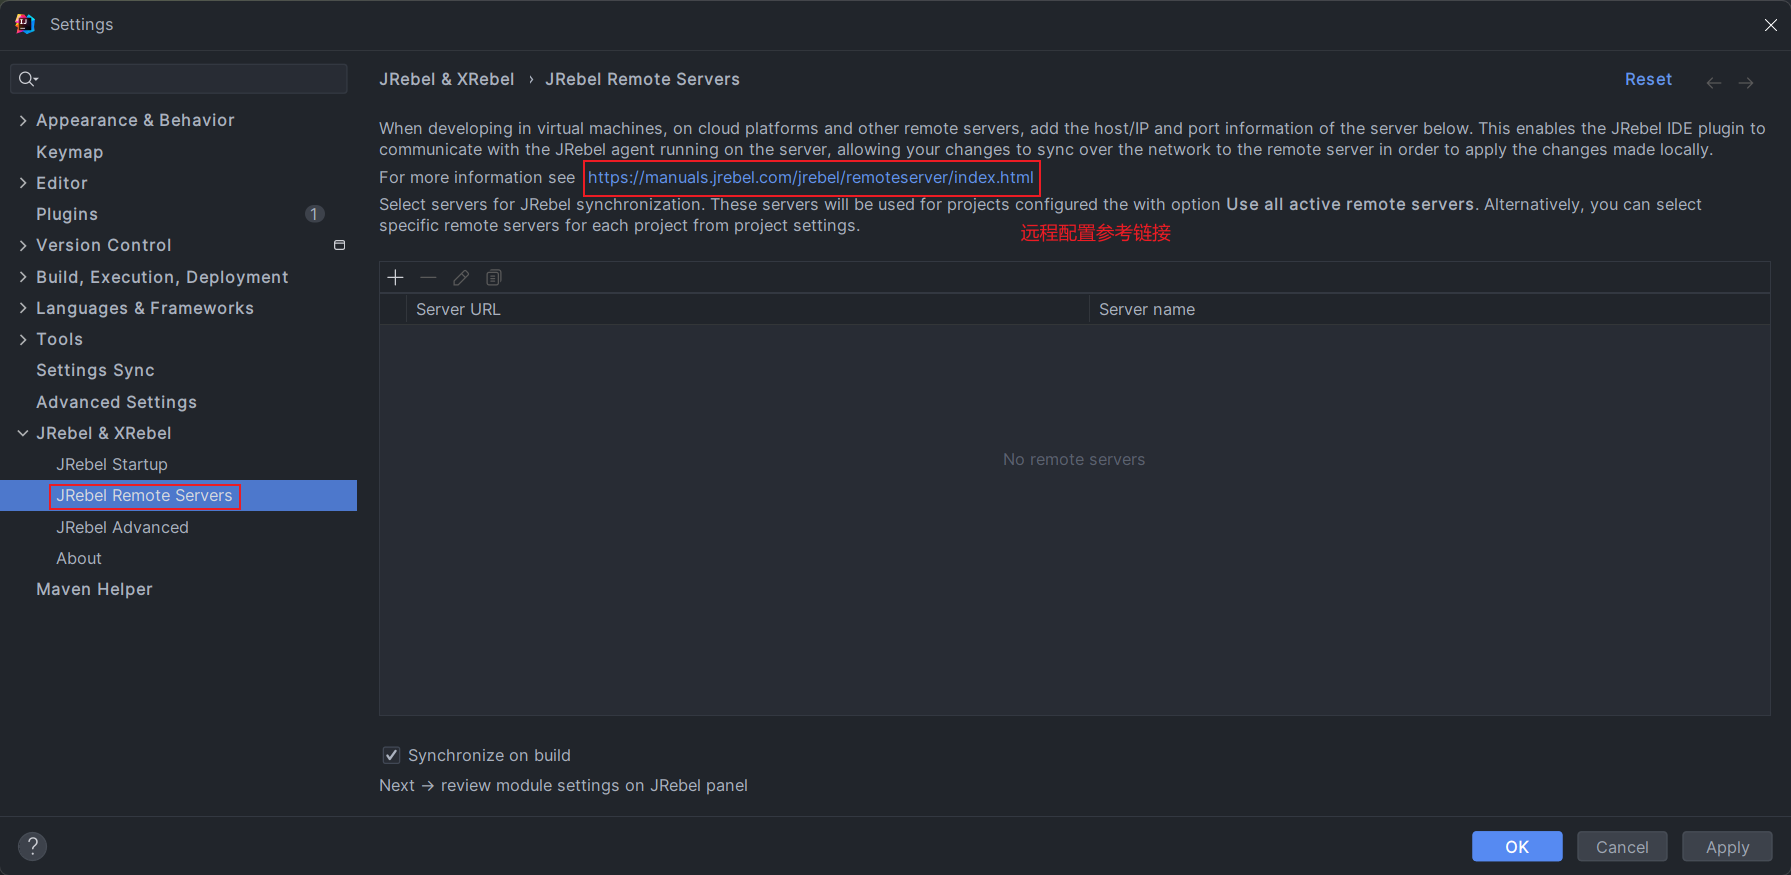
官网链接(图二):https://manuals.jrebel.com/jrebel/remoteserver/index.html
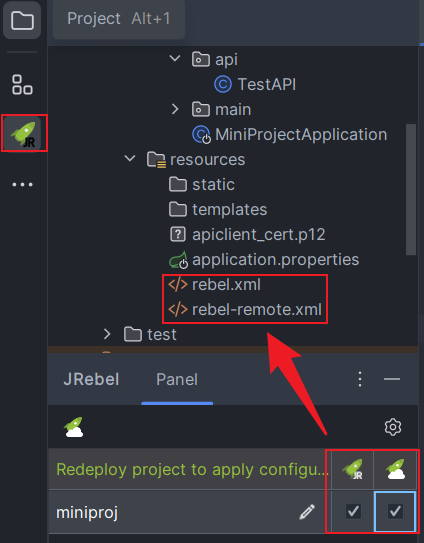
1、本地项目创建 rebel.xml 和 rebel-remote.xml
rebel.xml 指定本地 classes 编译路径;rebel-remote.xml 赋予每一个项目一个唯一的 id,因为一个服务端可以运行多个项目,需要这个 id 来区分。远程服务器只会监听拥有 rebel-remote.xml 的项目,比如 tomcat 有二十个项目,只有一个有 rebel-remote.xml,那么只有这个项目才会被热更新。
创建方式有两种:
右键项目,选中 JRebel,点击 Enable Jrebel;重复,点击 Enable remote server support。
侧边栏找到 JR 图标,勾线两个复选框即可。
2、下载代理文件到服务器
打开上图的远程配置参考链接,找到 JRebel standalone | Download,下载 zip 上传到服务器,如 jrebel-2023.4.2-nosetup.zip。解压 zip,找到代理文件 lib/libjrebel64.so,比如我的位置在:/root/jrebel/lib/libjrebel64.so,记住这个位置后面会用到。
3、设置代理文件的密码
java -jar jrebel.jar -set-remote-password 12345678
jrebel.jar 我的位置在 /root/jrebel/jrebel.jar,密码至少8位由你决定。
4、服务器程序的启动
4.1 jar 包启动
nohup java "-agentpath:/root/jrebel/lib/libjrebel64.so" -Drebel.remoting_plugin=true -jar miniproj-0.0.1.jar &4.2 tomcat 启动(war包或其他)
进入 tomcat/bin,创建文件 catalina-jrebel.sh,输入如下内容,注意替换 REBEL_HOME 的地址:
#!/bin/bash
export REBEL_HOME="/root/jrebel"
export JAVA_OPTS="\"-agentpath:$REBEL_HOME/lib/libjrebel64.so\" -Drebel.remoting_plugin=true $JAVA_OPTS"
`dirname $0`/catalina.sh start $@
使用 ./catalina-jrebel.sh 启动 tomcat。
另外:脚本中的 dirname $0 是指脚本所在的目录,如果要使用软链接【 ln -s 源文件 目标链接】,需要替换成绝对路径。如 /www/server/tomcat/bin/catalina.sh,
ln -s /www/server/tomcat/bin/catalina-jrebel.sh /root/startup.sh。
#!/bin/bash
export REBEL_HOME="/root/jrebel"
export JAVA_OPTS="\"-agentpath:$REBEL_HOME/lib/libjrebel64.so\" -Drebel.remoting_plugin=true $JAVA_OPTS"
/www/server/tomcat/bin/catalina.sh start $@
添加执行权限:
chmod +x /www/server/tomcat/bin/catalina-jrebel.sh
5、idea 配置 JRebel Remote Server
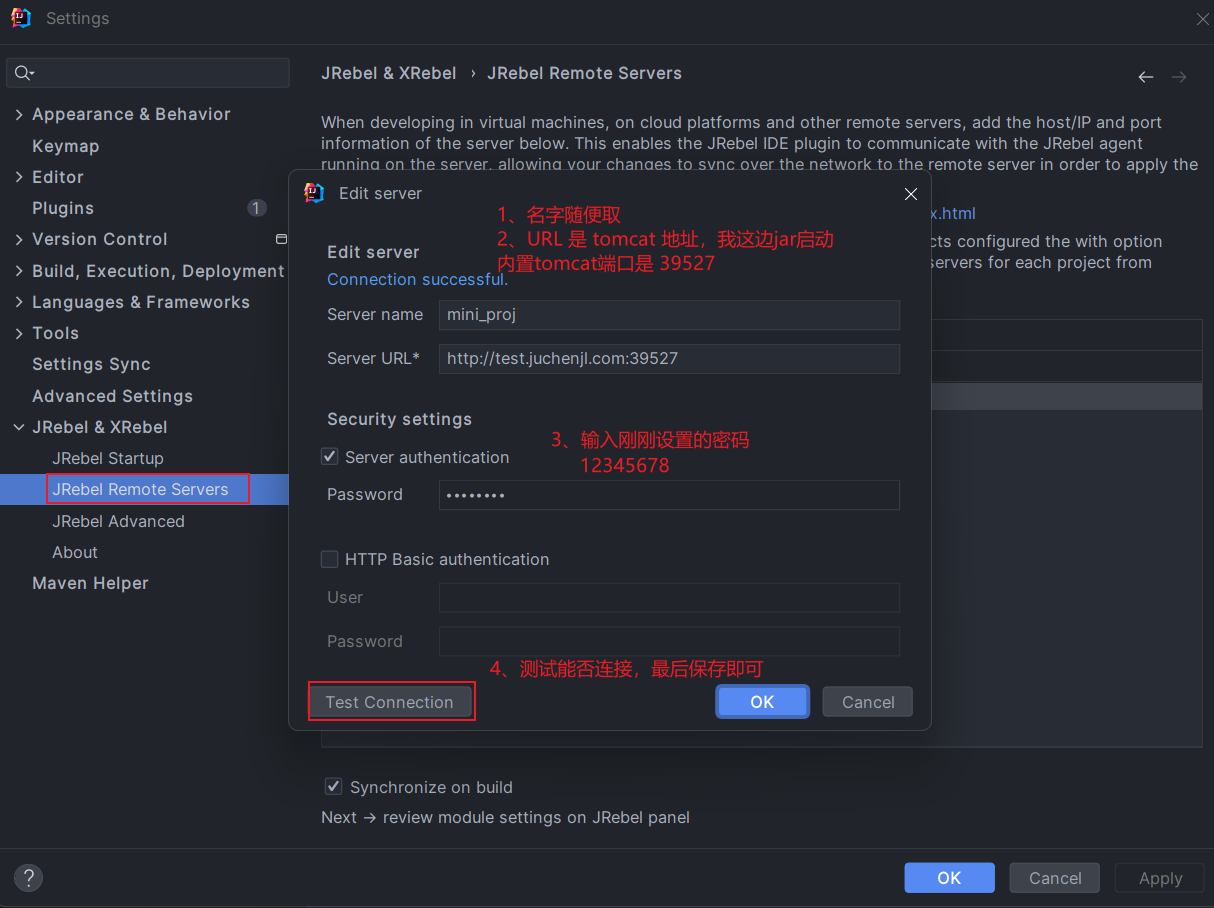
如上图配置即可,图片底部可以看到勾选了 Synchronize on build,也就是如本地热更新一样,编辑完之后 ctrl + 9 编译项目就可以了。重新刷新页面或接口就会发现更新已生效。
或者点击下图的 Synchronize module 的 JRebel 按钮(这个一般不用)。
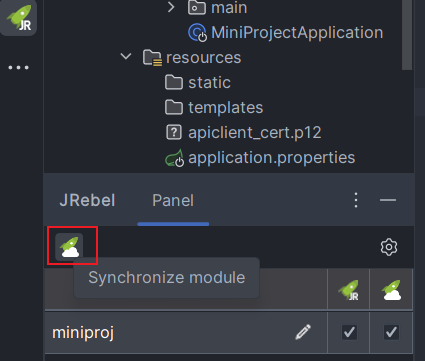
启用/停用,上图的第二个复选框(云朵图标)勾上就是启用,不勾就是禁用。每次打开 IDEA,都会发现 Synchronize module 这个云朵变灰了,只需要切换下复选框即可。
6、tomcat 配置可能出现的问题
[Catalina-utility-1] org.apache.catalina.webresources.Cache.backgroundProcess The background cache eviction process was unable to free [10] percent of the cache for Context [/jenkins] - consider increasing the maximum size of the cache. After eviction approximately [10,120] KB of data remained in the cache.问题使用 rebel 启动之后,tomcat 频繁打印上面的日志。
原因是 tomcat 一个清除 WEB 资源缓存的后台进程,清理之后剩余还是低于 10%,这会造成频繁清理的问题。
解决方案是增加缓存大小:
tomcat / conf / context.xml 增加一行代码:
<Resources cachingAllowed="true" cacheMaxSize="102400" />cacheMaxSize 单位是 kb,默认是 1024 kb(1M),大小改为 100M。